The Best Way To Get Rid Of Peeling Paint

peeling-paint-minIntroduction – Causes of peeling paint 

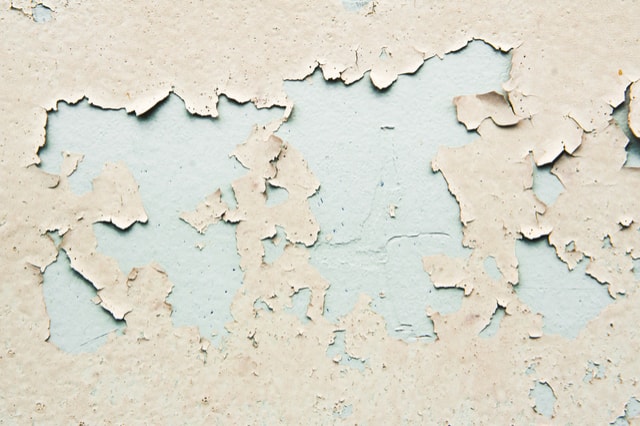
What causes paint to peel? Peeling happens when you paint over an area that has built up soap scum and water such as toilet or bathroom ceilings and walls. It also happens when you paint in high humidity conditions. This causes moisture to seep to the paint surface from the wall. 

Walls with peeling paint therefore become unsightly, and they become breeding grounds for different types of bacteria. If the wall is peeling in a common place such as the sitting room, the homeowner becomes embarrassed. That is why it is advisable to repaint a wall that is showing signs of peeling paint so that you can restore and make the wall attractive once more. 

Getting Rid of Peeling Paint 

The following tips will help you get rid of peeling paint and repaint the area for better results: 

1. Protect yourself and prepare your workspace – This is the initial stage of painting. Protecting yourself by wearing glasses, safety masks, and gloves is paramount. You should then make your workspace by placing a large piece of plastic near your working area whose work is to catch stray bits of paint. Another consideration is to tape off trim areas that are near your working space and remove any finishings such as furniture from the place. 

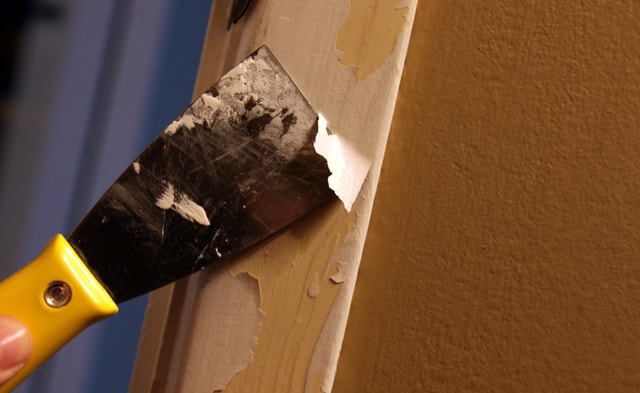
2. Remove the area with paint problems – You have to use a paint scraper or wire brush to remove all the loose paint from the affected areas. 

3. Make any necessary repairs – After removing the peeling paint, cracks or holes may be left. You should then fix them before repainting the area. You can do this by applying a patching compound by use of a putty knife. Then smooth the area and let it dry as instructed. 

4. Prepare a smooth surface – You can do this by sanding the area to be fixed by use of fine-grit sandpaper with a motive of removing any lines or grooves. In this way, you will have a very smooth surface. 

5. Clean the area – The area to be painted should then be cleaned by using a lightly damp sponge or tack cloth. A thorough cleaning should be done by wiping the area to be painted, again with a clean rag and once more with a dry rag. After that, let the wall dry completely. 

6. Prime the walls – You are supposed to prime the walls if the cause of peeling the paint was moisture. Allow the area to dry after covering it with a primer. This is an essential stage because your new to be applied paint must be protected from the same moisture problem. 

7. Finally, do the painting – With a wall ready to be painted, you are supposed to look for the best paint colour. The first coat should be applied evenly and then let to dry. After that, apply the second coat and let it dry too. Clear everything from your site and wait for the best results. 

Conclusion 

With signs such as the paint surface having holes and spidery cracks, the paint on walls is bound to start peeling. Noticing such conditions at an early stage is critical to put the precautionary measures that have been explained above. In that way, you can avoid embarrassments.

An Overview of The Standard Paint Stripping Process

paint stripping

Standard Paint Stripping Process

Removal of paint can be an arduous task especially when hazardous fumes, corrosive chemicals, and substantial paint remains do not get off as expected. It is advisable to look for an expert when such kind of jobs come up. A high level of professionalism should be displayed when removing paint from brick surfaces.
Proper tools, in-depth knowledge, and specialized care can make a huge difference when it comes to such jobs. Paint as well needs to be removed from the surface of both the mortar and brick. One crucial aspect is to ensure the surface below is not damaged.

Painted brick surfaces can undergo continued spoilage in mortar joints. This takes place when there is moisture in between the brick, paint, and mortar. The outer part of a brick is more permeable, and therefore joints are prone to several stresses. Removal of paint becomes a difficult task to undertake without interfering with the outer part, of for example a brick chimney.

In most cases, many homeowners opt to do the work all alone rather than pay someone to do it for them. It is not advisable though, because the right tools, materials, and expertise are needed so as the job can be done correctly without any damages to humans.

Preparing the area of work

Paint removal can be effortless, cleaning up the remains can be very challenging though. Segments of paint should not spill over the floor or ground adjacent to your chimney or brick wall, a lot of plastic protection and groundsheet is needed to keep the paint drops and other debris in a central place that can be easy to clean.

A contractor doing the job should ensure that any areas that unpainted are quarantined and taped off. Before paint removal materials are applied, workers should do away with flaking or loose paint. The most used equipment is a scraper or a putty knife.

Application of Paint Remover

The best way to clear away paint from a brick chimney is by use of an adherent paint removing compound. The moment paint remover gets into contact with the brick; it immediately develops a chemical reaction which in turn forces the paint to produce its tight bond to the brick. This process does not damage the brick and mortar’s surface which is delicate.

The adherent paint removal sheets sheath the whole brick surface laying one over the other for about 24 hours. The materials are scaled off by use of a putty knife. A steel brush should be used whenever there are stubborn pieces in the brick.

Using Pressure to Wash

After most of the paint has is removed by hand, the dirt is safely disposed of. Use of a power washer can clean the surface of the brick hence no paint leftover. At some point, a nontoxic detergent can be applied. The surface should be left to dry for about three days after which disintegrated mortar joints, and spoiled bricks get fixed.

The Best Paint Stripping Tools On The Market

paint stripping tools
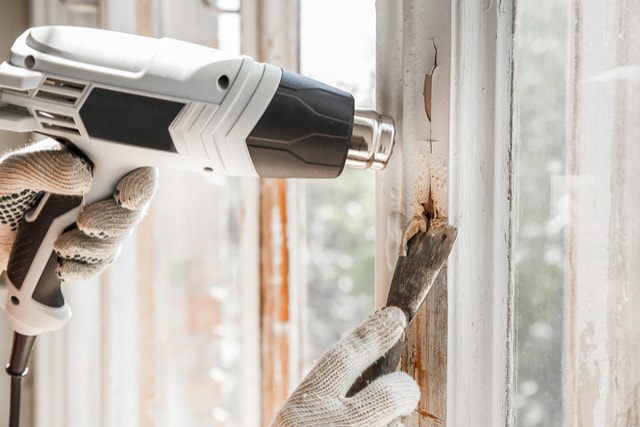
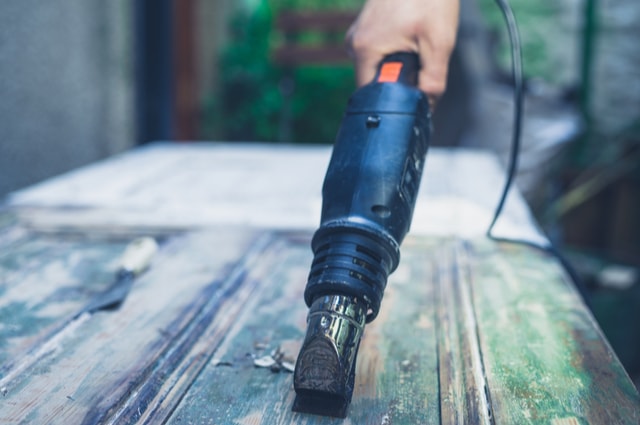
If you are stripping paint on a house, you need to look for the best tools to make your job easier. Some work better compared to others, and their performance usually depends on the condition and type of paint you’re removing. Here are some of the best paint stripping tools on the market:

Tacklife Electric Paint Stripper Gun

This tool is among the most versatile paint stripper guns you will find in the market. It offers numerous ways of getting your job done. It is great at the basics; it heats up to full temperature within 60 seconds and has a great airflow throughout. Also, it comes with three heat settings for coping with the toughest paints as well as the most delicate surfaces, plus a dedicated cooling mode. It offers 4 nozzle attachments, which includes an extension tube that makes it suited to most of the tasks such as paint stripping and softening caulk.

DeWalt 240 Volts Twin Settings Electric Paint Stripper

Generally, DeWalt are regarded as the crown princes when it comes to power tools. Hence, it stands to reason they would know how to create a great heat gun. Although it cannot be beaten when it comes to performance (it can melt anything), it takes the top position for its design as well. It is compact and light to avoid putting lots of pressure on your wrists over long stretches, and still made to last through many full-on jobs, and users love how it saw off jobs that are tough.

Speedheater

Typically, infrared paint removal might sound like something complex to the average homeowner, but in actual sense, it isn’t. In fact, the Speedheater is not slowed down by numerous layers of paint. You can even use it to strip thirteen layers of paint from an old window in just a single pass. The infrared heat makes the paint to lose the bond it has with the wood very fast.

Continue reading “The Best Paint Stripping Tools On The Market”